Add Connectors to the Delivery Flow
Depending on the job processing location you selected, only the usable connectors for either On Server or On Device are displayed. You can add a new destination connector, a new process connector, and a shared connector to the delivery flow.
For details about configuring the properties of a destination or process connector, refer to Configure the Destination Connector Properties and Configuring the Process Connector Properties.
On the [Delivery Flow] tab, position the destination and process connectors, and configure the delivery flow and data processing of the scanned document. Add a destination connector to the delivery flow to configure the data delivery method and delivery location. Add a process connector to configure data conversion and change the metadata.
When you configure the new connector properties, the settings are applied only to the current workflow you are configuring. Instead, you can create a shared connector with preset properties that you can apply to all workflows. For details about configuring the shared connectors, refer to Create a Shared Connector
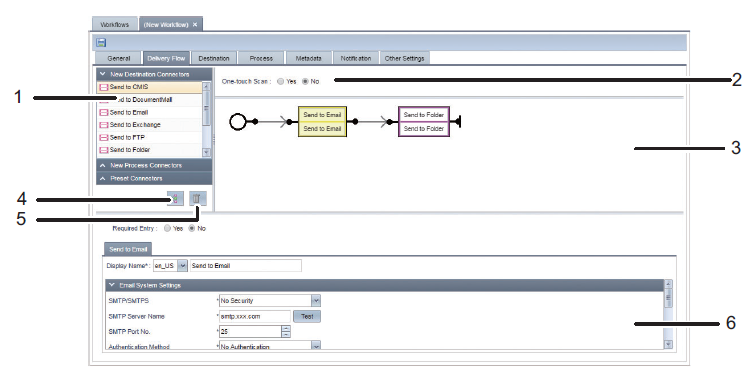
The following screen capture shows the layout of the [Delivery Flow] tab and describes the functions.
-
Connector List
Select from [New Destination Connectors], [New Process Connectors], and [Shared Connectors] for the connector to use. The connectors that are displayed vary depending on the Job Processing Location Setting. For details, refer to Available Process Connectors and
Click the  (Filters) button and enter filter conditions in the input field to filter the Shared Connectors list.
-
One-touch Scan
To configure the workflow for one-touch scan, select [Yes]. For details about the one-touch scan settings, refer to Configure One Touch Scan.
-
Delivery flow edit pane
Create a delivery flow by dragging and dropping connectors from the [New Destination Connectors], [New Process Connectors], and [Shared Connectors] lists and positioning the connectors in the order of processing. For details, refer to Create a Job Processing Workflow.
-
 (Arrange)
This arranges the positioned destination and process connectors to make them easier to refer to. It also eliminates multiple destination and process connectors overlapping on each other.
-
 (Trash)
The connector can be removed from the delivery flow by dragging and dropping a connector from the delivery flow edit pane to the trash can button.
-
Connector properties window
The window for editing the properties of the selected connector is displayed in the delivery flow edit pane.
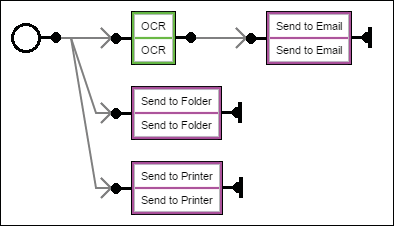
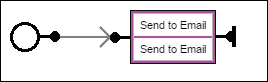
Direct vs. Redirect Delivery Flows
Create a delivery flow with or without redirects.

In a delivery flow without redirects, scanned documents are processed in order starting from the destination or process connector on the left side of the flow.
Example of a delivery flow without redirects: In a delivery flow with redirects, the document is processed using the different destination or process connector at each redirect.
Example of a delivery flow with redirects:
To create the flow:
-
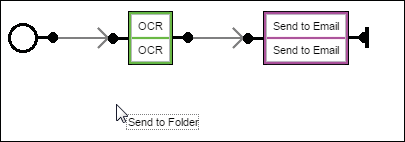
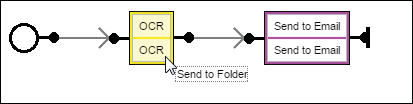
Drag the destination or process connector you want to add to the delivery flow from the connector list, and drop it in an open area in the delivery flow edit pane.
A new redirect is added to the starting point (  ) of the delivery flow.
To add another destination or process connector, drag the destination or process connector you want to add from the connector list and drop on the position you require.
To add a connector between connectors and at the end of the delivery flow, drop it on the position you require.
-
Add a connector between connectors:
-

Adding a connector at the end of the delivery flow. -
To add a new redirect at the starting point, drop the connector on an open area in the delivery flow edit pane. -
-
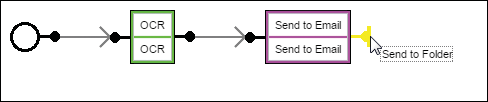
To add a new redirect between connectors, drop the connector you want to add on top of the connector right before the start of the redirect.
Shared Connectors: You can only add the same shared connector once to the same workflow.If you try to add it more than once, the message "You cannot use a shared connector multiple times in a workflow. Do you want to make it local to the workflow?" is displayed. When you select [Yes], the shared connector settings are copied, a new connector is created, and the settings can be changed. After you convert a connector to a new connector, the settings are not applied even when changing the original shared connector settings. When you select [No], the shared connector is not added.
-
To change the position of a connector, drag and drop the connector you want to move on top of the connection of the destination connector. To move a connector to the end of the delivery flow, drop it at the end of the delivery flow.


-
To change the position of a connector and create a new redirect, drag and drop the connector you want to move on top of the starting point or connector at the starting position of a redirect.
-
To delete a connector from the delivery flow, Drag and drop the connector to delete from the delivery flow edit pane to
(Trash). A connector can be deleted also by selecting it on the delivery flow edit pane and clicking (Trash). -
Click [OK] on the confirmation message that is displayed.
The connectors before and after the deleted connector are automatically connected.